If you're into weightlifting in any shape and form to improve pectus excavatum, you need to get tissue work done. You can go to a neuromuscular therapist or do it by foam rolling. Not everybody has the time or money to go to a therapist all the time for something that I recommend you do daily.
Luckily, there are simple ways to reverse these postural issues. One of the ways is to implement the regular use of a foam roller. There are tons of ways your pectus excavatum and posture can benefit from doing this self-massage.
It will improve circulation, release muscle tightness points, eliminate trigger spots in the muscles, and minimize muscle aches and tension. The best part of foam rolling for pectus excavatum is that you can do it from the coziness of your house.
THE BIGGEST PROBLEM I HAVE WITH FOAM ROLLING
I realized I needed to make foam rolling a part of my daily routine again. The biggest problem is that it can hurt a lot if done correctly.
When I get back to foam rolling after taking some time off, I am in extreme pain when I lay on it and start doing the movements. At first, I thought I shouldn't feel that pain.
However, after watching many videos, I realized I had a lot of muscular tension. That caused the pain. Suppose you don't feel pain while doing it. In that case, you probably are doing it wrong, or you don't have any muscular tension in that area.
4 FOAM ROLLER TIPS
I will share the top 5 foam rolling exercises to help you improve your pectus posture, muscle tension, and overall body appearance. Before doing the exercises, you need to keep a few points in mind.
1. Always foam roll slowly
A lot of people go up and down the foam roller quickly. Meanwhile, their muscular system resists the roller because of pain. There is a force of the foam roller against your muscular tissue. That is why it can still hurt after trying foam rolling for an extended period.
You won't get the soft tissue release you're trying to get. Look at foam rolling as a marathon and not a sprint. Muscle tension needs time to be fully released. Every time you find a tight spot, spend more time on that spot. That is a clear sign your body is telling you to spend more time. You will feel more relaxed after doing that.
2. Breathe slowly and in control
It can hurt when you stumble upon a trigger point. Keep your breathing relaxed. Practicing proper breathing techniques will help you minimize the pain.
3. Foam roll consistently
This will help you with form and pain tolerance. You will attain better results and improve your overall pectus excavatum appearance. Keep a constant routine.
For example, foam roll before school, after school, before you go to sleep, etc. Stick to this routine so you won't spend a lot of willpower on foam rolling.
4. Focus on a spot
When you stumble upon a tight spot, let the foam roller rest on that spot. You'll understand there is resistance from the tight muscle versus the foam roller. Stay there and breathe instead of foam rolling up and down the entire muscle.
Try to go to a meditative spot. When you relax and breathe, you will notice how the muscle is shaking in pain. Still, ultimately the tension calms down, and your muscle softens when you start breathing calmly into it. Your body will stop fighting against the foam rolling. You begin to allow foam rolling.
Instead of swiftly rolling up and down a specific muscle, and being so unaware of what is happening to your body that you're fighting, take your time. Foam rolling can take an hour. Find the tight tissue, stay on it, and seduce the muscle.
Pretend that you put the muscle to sleep. You don't force yourself into sleep; you allow yourself to sleep. That's the way you will benefit from myofascial release with a foam roller.
Now that you know what to do, it is time to show you the exercises. First, I will show you how to foam roll for some of the most prevalent problems of pectus excavatum and flared ribs sufferers.
5 BEST FOAM ROLLER EXERCISES FOR PECTUS EXCAVATUM
CHEST AND SHOULDERS OPENER


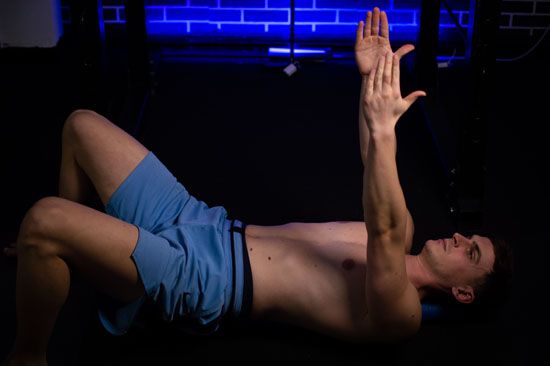
You can do this without a foam roller if you have a terrible pectus posture. To get started, get on the mat and take the foam roller. Start by laying down directly on the foam roller.
Make sure your head is supported on the roller through the pelvis. Reach with both arms to the ceiling, and drop the shoulders back and down. While keeping the arms straight, inhale and move the arms to your sides.
Reach as long and as wide as you can with your arms. Exhale, and bring both arms back to starting position. This exercise is very similar to the dumbbell fly, except that you don't have any weights in your arms.
This is a more stretching-focused exercise. You will be more comfortable lying on the foam roller as you train. Keep your eyes on a single spot on the ceiling to maintain balance.
After you've done ten repetitions this way, now start doing snow angels with your arms. When your straight arms reach the floor, start moving the arms until they get above your head. Then, with straight arms, try to touch your heels. Throughout the movement, the palms should remain facing up to the ceiling. Do the exercise slowly.
The shoulders and chest of most people with pectus excavatum are tight. Because of this, you will notice that you want to move your back. Keep the core tight and a straight spine while doing snow angels with your arms.
Pause on a particular spot if you feel some tension and tightness there. Breathe slowly on that spot until it releases. I feel that spot when I am in a Y-position with my arms.
Inhale and reach as wide as you possibly can with your arms. Then, exhale and while being fully extended, put your arms to the floor. While inhaling, slowly move your extended arms above your head. Exhale and bend the elbows to a cactus arms shoulder position.
Then, reach the arms behind you once again. How long your arms reach the floor and keep a straight spine depends on your body's flexibility. It would be best to position the elbows higher than your hands for a better stretch.
If you have a poor pectus posture and a pot belly, the exercises will feel very intense if you move the arms slowly through space. Take your time. The point of the exercise is not to rush anything.
Stay in a cactus arm position and feel the chest and shoulder stretch. Keep the front of your body relaxed and extended. Breathe in this position for 1 minute. To finish this exercise, slowly roll off the foam roller. Shake your body and feel the incredible sensations emerging from the exercise.
THORACIC SPINE FOAM ROLL

This foam roll exercise will open up your hunched-over upper back. You will do the thoracic extensions on a foam roller to work on thoracic mobility. This is one of the best exercises to mobilize your spine.
To start the exercise, you must sit in front of a foam roller. Lay back on the roller, so it lines up with the lower part of the ribcage. Keep your feet on the floor, bend your knees and keep your butt on the ground.
Place your hands on the back of your head for support. Slowly extend yourself backward on the roller. Do it slowly, so you don't feel any significant pain.
Extend your back to the ground and back three times, then, using your feet, slowly push yourself up and back, rolling your back on the foam roller. You will probably hear some back or sternum cracks, but that is okay. You will probably tend to flare up your ribs as you extend back.
Please don't allow them to pop out. Consciously keep the ribs down, and engage your core throughout the movement. Don't make a lot of motion with your neck. The point of this exercise is not to mobilize the neck muscles. We need to mobilize the upper-mid part of the back. The use of the hands is to hold your head. You shouldn't feel any discomfort or pain in the neck.
It would be best never to foam roll your lower back and neck and never push yourself into pain. Do three extensions on each of the four sections (from the lower ribcage to the top of the shoulder blades). Start with the roller on the lower part of the ribcage.
Start extending back with your hands on your head's back without extending your ribcage. Do three repetitions on this section of your body. Then slowly roll the foam roller up your back.
Do this until you do three repetitions on the top part of the upper back. Then, lift your butt and roll your entire upper back and forth on the foam roller ten times.
QUADRICEPS FOAM ROLL

While sitting for an extended period, your hip flexors shorten. This leads to anterior pelvic tilt (pectus potbelly), knee issues, and low back pain. In addition to the exercise I am about to show you, you need to take frequent walks away from the desk you spend most of the day working. The two attachments on the quadriceps are where most of the tension will be.
To start foam rolling the quadriceps, you need to get in a plank position with your elbows on the ground and back straight. Work the inside of the muscle, the middle, and the outside.
Many people suffering from pectus excavatum have tight spots at the top of the quad. The rectus femoris muscle usually holds a significant amount of tension.
It crosses two joints across the knee and hip. Releasing the pressure of this muscle is very important. Look for any area of tension and spend some time there.
GLUTES

For foam rolling the glutes, I prefer using a firmer roller. It helps me target tight spots better than a soft foam roller. Sitting for a lengthened period will result in the weakening of the glute muscle. Foam rolling will help you get rid of any harmful trigger points.
Tight and weak glutes can cause slouching. You need to strengthen and soften the glutes if you have poor posture and tend to hunch over during the day. Also, poor glute flexibility causes back pain and hip problems. Rolling your glutes will increase your hip flexibility for a better range of motion.
It can help you get rid of the pectus pot belly. Start sitting on the foam roller. Lean back and place the hand down on the ground. Balance the leg you use the foam roller on and cross the ankle over the other leg's knee. That will help you slightly rotate and flex the hip.
That will help you target the piriformis muscle better. Support yourself with your hand and foot. Roll slowly up and down your entire glute muscle. If you find a tight spot, spend time there. Try to foam roll the sides of the glutes. Roll for at least two minutes on each leg.
FOAM ROLL PEC ROLLOUT
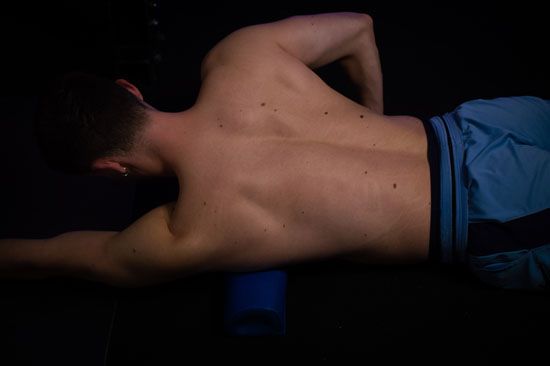
The sunken chest deformity causes tension in the frontal upper body area. If the deformity is severe, the body acts in hunching as a natural defensive mechanism for hiding the deformation. You can reduce this tension by adding the pectoral muscle rollout exercise. The purpose of the exercise is to loosen up the trigger points and increase the mobility of the muscles around the pectoral region.
This will help you improve posture and prepare your body for any bodybuilding exercise you're about to perform in the gym to improve pectus excavatum. To execute the exercise, you must lie on the ground with the foam roller in your armpit.
Then, roll forward until you feel a trigger point in your pec muscle. Slowly lower your body to foam roll the lower part of the muscle.
Then, using your off arm, control your body and foam roll the middle chest area. Roll out the chest area until you find a trigger point, and isolate it on the spot. Perform the exercise for about two minutes, ensuring you eliminate any muscular trigger points.
BENEFITS OF FOAM ROLLING IN ADDITION TO YOGA AND PILATES
Practicing yoga can promote the myofascial release, especially during Vinyasa yoga practice. While yoga is a fantastic way to strengthen and stretch the postural muscles required to improve poor pectus excavatum posture, foam rolling can free up more mobility than corrective stretching or yoga practice alone.
Because of that, I am a huge fan of adding foam rolling to your daily yoga and Pilates work. The deepest tissue level where scar tissue often builds up can be reached better and softened with a combination of foam rolling and yoga.
If you have pectus excavatum and your job demands you to sit down and look at screens, stand up, and put the computer in an elevated position that allows you to stand while working.
This may be more physically challenging at first. You may feel exhausted after an entire shift, especially if your deformity is severe and causes you to exercise intolerance. However, you will get used to it. You'll build the strength and endurance to endure a complete shift.
The benefits will be huge, and your pectus posture will stop worsening, improving your sunken chest appearance.
2 Sources
- Foam Roller Benefits, Risks, and How To [Internet]. [cited 2022 Dec 2]. Available
from: https://www.healthline.com/health/foam-roller-benefits - Roll It Out: 5 Ways to Incorporate Foam Rolling into a Regular Yoga Practice |
YogaUOnline [Internet]. [cited 2022 Dec 2]. Available from:
https://yogauonline.com/yoga-practice-tips-and-inspiration/roll-it-out-5-waysincorporate-foam-rolling-regular-yoga-practice


